Backup Stand-alone PVC using Stash
This guide will show you how to backup a stand-alone PersistentVolumeClaim (PVC) using Stash. Here, we are going to backup a PVC provisioned using an NFS server into a GCS bucket.
Before You Begin
-
At first, you need to have a Kubernetes cluster, and the
kubectlcommand-line tool must be configured to communicate with your cluster. If you do not already have a cluster, you can create one by using Minikube. -
Install
Stashin your cluster following the steps here. -
You will need to have a PVC with
ReadWriteManyaccess mode. Here, we are going to use an NFS server to provision a PVC withReadWriteManyaccess mode. If you don’t have an NFS server running, deploy one by following the guide here. -
You should be familiar with the following
Stashconcepts:
To keep everything isolated, we are going to use a separate namespace called demo throughout this tutorial.
$ kubectl create ns demo
namespace/demo created
Note: YAML files used in this tutorial are stored in docs/examples/guides/latest/volumes directory of stashed/docs repository.
Verify necessary Function and Task:
Stash uses a Function-Task model to backup stand-alone volume. When you install Stash, it automatically creates the necessary Function and Task to backup a stand-alone volume.
Let’s verify that Stash has created the necessary Function to backup/restore PVC by the following command,
$ kubectl get function
NAME            AGE
pvc-backup      117m
pvc-restore     117m
update-status   117m
Also, verify that the necessary Task has been created,
$ kubectl get task
NAME          AGE
pvc-backup    118m
pvc-restore   118m
Prepare Volume
At first, let’s prepare our desired PVC. Here, we are going to create a PersistentVolume (PV) that will use an NFS server as storage. Then, we are going to create a PVC that will bind with the PV. Then, we are going to mount this PVC in two different pods. Each pod will generate a sample file into the PVC.
Create PersistentVolume:
We have deployed an NFS server in storage namespace and it is accessible through a Service named nfs-service. Now, we are going to create a PV that uses the NFS server as storage.
Below is the YAML of the PV that we are going to create,
apiVersion: v1
kind: PersistentVolume
metadata:
  name: nfs-pv
  labels:
    app: nfs-demo
spec:
  capacity:
    storage: 1Gi
  accessModes:
  - ReadWriteMany
  nfs:
    server: "nfs-service.storage.svc.cluster.local"
    path: "/"
Notice the metadata.labels section. Here, we have added app: nfs-demo label. We are going to use this label as selector in PVC so that the PVC binds with this PV.
Let’s create the PV we have shown above,
$ kubectl apply -f ./docs/examples/guides/latest/volumes/pv.yaml
persistentvolume/nfs-pv created
Create PersistentVolumeClaim:
Now, create a PVC to bind with the PV we have just created. Below, is the YAML of the PVC that we are going to create,
apiVersion: v1
kind: PersistentVolumeClaim
metadata:
  name: nfs-pvc
  namespace: demo
spec:
  accessModes:
  - ReadWriteMany
  storageClassName: ""
  resources:
    requests:
      storage: 1Gi
  selector:
    matchLabels:
      app: nfs-demo
Notice the spec.accessModes section. We are using ReadWriteMany access mode so that multiple pods can use this PVC simultaneously. Without this access mode, Stash will fail to backup the volume if any other pod mount it during backup.
Also, notice the spec.selector section. We have specified app: nfs-demo labels as a selector so that it binds with the PV that we have created earlier.
Let’s create the PVC we have shown above,
$ kubectl apply -f ./docs/examples/guides/latest/volumes/pvc.yaml
persistentvolumeclaim/nfs-pvc created
Verify that the PVC has bounded with our desired PV,
$ kubectl get pvc -n demo nfs-pvc
NAME      STATUS   VOLUME   CAPACITY   ACCESS MODES   STORAGECLASS   AGE
nfs-pvc   Bound    nfs-pv   1Gi        RWX                           32s
Here, we can see that the PVC nfs-pvc has been bounded with PV nfs-pv.
Deploy Workload:
Now, we are going to deploy two sample pods that mount the PVC we have just created. Each of the pods will generate a sample file named pod-1.conf and pod-2.conf respectively. We are going to backup these files using Stash.
Below, is the YAML of the first pod that we are going to deploy,
kind: Pod
apiVersion: v1
metadata:
  name: demo-pod-1
  namespace: demo
spec:
  containers:
  - name: busybox
    image: busybox
    command: ["/bin/sh", "-c","touch /shared/config/pod-1.conf && sleep 3000"]
    volumeMounts:
    - name: shared-config
      mountPath: /shared/config
  volumes:
  - name: shared-config
    persistentVolumeClaim:
      claimName: nfs-pvc
Here, we have mount the nfs-pvc into /shared/config directory of the pod. Let’s deploy the pod we have shown above,
$ kubectl apply -f ./docs/examples/guides/latest/volumes/pod-1.yaml
pod/demo-pod-1 created
Verify that the pod has generated a sample file named pod-1.conf in /shared/config/ directory,
$ kubectl exec -n demo demo-pod-1 ls /shared/config
index.html
pod-1.conf
Below is the YAML of the second pod that we are going to deploy,
kind: Pod
apiVersion: v1
metadata:
  name: demo-pod-2
  namespace: demo
spec:
  containers:
  - name: busybox
    image: busybox
    command: ["/bin/sh", "-c","touch /shared/config/pod-2.conf && sleep 3000"]
    volumeMounts:
    - name: shared-config
      mountPath: /shared/config
  volumes:
  - name: shared-config
    persistentVolumeClaim:
      claimName: nfs-pvc
Let’s create the pod we have shown above,
$ kubectl apply -f ./docs/examples/guides/latest/volumes/pod-2.yaml
pod/demo-pod-2 created
Verify that the pod has generated a sample file named pod-2.conf in /shared/config/ directory,
$ kubectl exec -n demo demo-pod-2 ls /shared/config
index.html
pod-1.conf
pod-2.conf
As we have mounted the same PVC into the pods, the file created by one pod is available to others. Hence, we are seeing both pod-1.conf and pod-2.conf inside pod demo-pod-2.
Backup
Now, we are going to backup the PVC nfs-pvc in a GCS bucket using Stash. We have to create a Secret and a Repository object with access credentials and backend information respectively.
For GCS backend, if the bucket does not exist, Stash needs
Storage Object Adminrole permissions to create the bucket. For more details, please check the following guide.
Create Storage Secret:
Let’s create a Secret named gcs-secret with access credentials of our desired GCS backend,
$ echo -n 'changeit' > RESTIC_PASSWORD
$ echo -n '<your-project-id>' > GOOGLE_PROJECT_ID
$ cat /path/to/downloaded/sa_key_file.json > GOOGLE_SERVICE_ACCOUNT_JSON_KEY
$ kubectl create secret generic -n demo gcs-secret \
    --from-file=./RESTIC_PASSWORD \
    --from-file=./GOOGLE_PROJECT_ID \
    --from-file=./GOOGLE_SERVICE_ACCOUNT_JSON_KEY
secret/gcs-secret created
Create Repository:
Now, create a Repository crd specifying the desired bucket, and directory inside the bucket where the backed up data will be stored.
Below is the YAML of Repository crd that we are going to create,
apiVersion: stash.appscode.com/v1alpha1
kind: Repository
metadata:
  name: gcs-repo
  namespace: demo
spec:
  backend:
    gcs:
      bucket: appscode-qa
      prefix: stash-backup/volumes/nfs-pvc
    storageSecretName: gcs-secret
Let’s create the Repository object that we have shown above,
$ kubectl apply -f ./docs/examples/guides/latest/volumes/repository.yaml
repository.stash.appscode.com/gcs-repo created
We are ready to start taking backup. Now, we have to create a BackupConfiguration object targeting nfs-pvc.
Create BackupConfiguration:
Below is the YAML of the BackupConfiguration object that we are going to create,
apiVersion: stash.appscode.com/v1beta1
kind: BackupConfiguration
metadata:
  name: nfs-pvc-backup
  namespace: demo
spec:
  task:
    name: pvc-backup
  repository:
    name: gcs-repo
  schedule: "*/5 * * * *"
  target:
    ref:
      apiVersion: v1
      kind: PersistentVolumeClaim
      name: nfs-pvc
    volumeMounts:
    - name: nfs-pvc
      mountPath: /shared/config
    paths:
    - /shared/config
  retentionPolicy:
    keepLast: 5
    prune: true
Here,
spec.task.namespecifies the name of theTaskobject that specifies theFunctionand their order of execution to perform a backup of a stand-alone PVC.spec.repository.namespecifies the name of theRepositoryobject that holds the backend information where the backed up data has been stored.spec.target.refrefers to the targeted PVC that will be backed up.spec.target.volumeMountsspecifies the path where the targeted PVC will be mounted inside the backup job.spec.target.pathsspecifies the file paths inside the PVC that will be backed up.
Let’s create the BackupConfiguration object that we have shown above,
$ kubectl apply -f ./docs/examples/guides/latest/volumes/backupconfiguration.yaml
backupconfiguration.stash.appscode.com/nfs-pvc-backup created
If everything goes well, Stash will create a CronJob to trigger backup periodically.
Verify CronJob:
Verify that Stash has created a CronJob to trigger a periodic backup of the targeted PVC by the following command,
$ kubectl get cronjob -n demo
NAME             SCHEDULE      SUSPEND   ACTIVE   LAST SCHEDULE   AGE
nfs-pvc-backup   */5 * * * *   False     0        <none>          28s
Wait for BackupSession:
Now, wait for the next backup schedule. You can watch for BackupSession crd using the following command,
$ watch -n 1 kubectl get backupsession -n demo -l=stash.appscode.com/backup-configuration=nfs-pvc-backup

Every 1.0s: kubectl get backupsession -n demo -l=stash.appscode.com/backup-...  workstation: Wed Jul  3 19:53:13 2019

NAME                        BACKUPCONFIGURATION   PHASE       AGE
nfs-pvc-backup-1562161802   nfs-pvc-backup        Succeeded   3m11s
Note: Respective CronJob creates
BackupSessioncrd with the following label:stash.appscode.com/backup-configuration=\<BackupConfiguration crd name>. We can use this label to watch only theBackupSessionof our desiredBackupConfiguration.
Verify Backup:
When backup session is completed, Stash will update the respective Repository to reflect the latest state of backed up data.
Run the following command to check if a backup snapshot has been stored in the backend,
$ kubectl get repository -n demo gcs-repo
NAME       INTEGRITY   SIZE   SNAPSHOT-COUNT   LAST-SUCCESSFUL-BACKUP   AGE
gcs-repo   true        80 B   1                25s                      49m
From the output above, we can see that 1 snapshot has been stored in the backend specified by Repository gcs-repo.
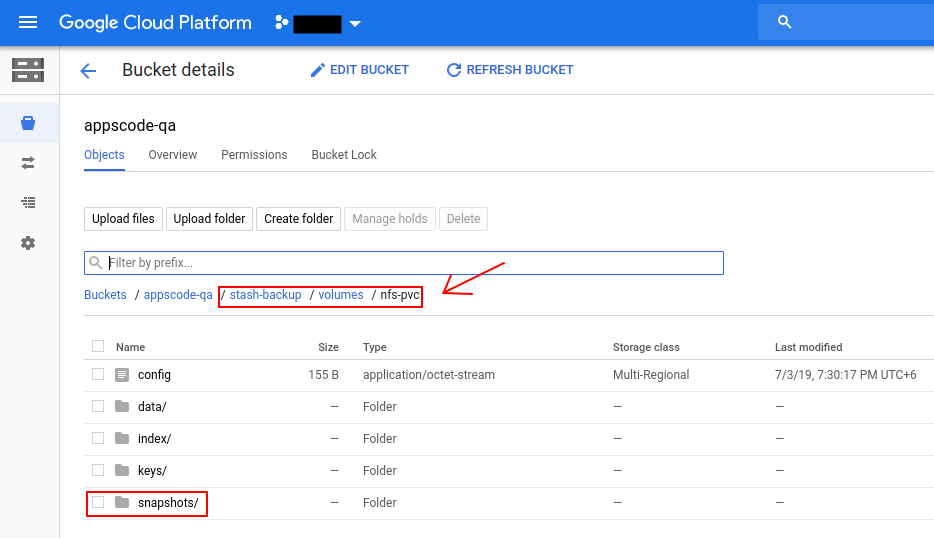
If we navigate to stash-backup/volumes/nfs-pvc directory of our GCS bucket, we are going to see that the snapshot has been stored there.
Stash keeps all backup data encrypted. So, snapshot files in the bucket will not contain any meaningful data until they are decrypted.
Restore
This section will show you how to restore the backed up data inside a stand-alone PVC using stash. Here, we are going to restore the data we have backed up in the previous section.
Stop Taking Backup of the PVC:
At first, let’s stop taking any further backup of the PVC so that no backup is taken during the restore process. We are going to pause the BackupConfiguration that we created to backup the nfs-pvc PVC. Then, Stash will stop taking any further backup for this PVC. You can learn more how to pause a scheduled backup here
Let’s pause the nfs-pvc-backup BackupConfiguration,
$ kubectl patch backupconfiguration -n demo nfs-pvc-backup --type="merge" --patch='{"spec": {"paused": true}}'
backupconfiguration.stash.appscode.com/nfs-pvc-backup patched
Now, wait for a moment. Stash will pause the BackupConfiguration. Verify that the BackupConfiguration has been paused,
$ kubectl get backupconfiguration -n demo
NAME             TASK   SCHEDULE      PAUSED   AGE
nfs-pvc-backup          */1 * * * *   true     20m
Notice the PAUSED column. Value true for this field means that the BackupConfiguration has been paused.
Simulate Disaster:
At first, let’s simulate a disaster scenario. Let’s delete all the files from the PVC.
$ kubectl exec -n demo demo-pod-2 -- sh -c "rm /shared/config/*"
Verify that all the files have been removed from the PVC,
$ kubectl exec -n demo demo-pod-2 ls /shared/config/
# empty output which means all the files have been deleted
Create RestoreSession:
Now, we are going to create a RestoreSession object to restore the backed up data into the desried PVC. Below is the YAML of the RestoreSession object that we are going to create,
apiVersion: stash.appscode.com/v1beta1
kind: RestoreSession
metadata:
  name: nfs-pvc-restore
  namespace: demo
spec:
  task:
    name: pvc-restore
  repository:
    name: gcs-repo
  target:
    ref:
      apiVersion: v1
      kind: PersistentVolumeClaim
      name: nfs-pvc
    volumeMounts:
    - name:  nfs-pvc
      mountPath:  /shared/config
  rules:
  - paths:
    - /shared/config
spec.task.namespecifies the name of theTaskobject that specifies theFunctionand their order of execution to restore data inside a stand-alone PVC.spec.target.refrefers to the targeted PVC where the data will be restored.spec.target.volumeMountsspecifies the directory where the targeted PVC will be mounted inside the restore job.mountPathmust be samemountPathas the original volume because Stash stores absolute path of the backed up files. If you use differentmountPathfor the restored volume then the backed up files will not be restored into your desired volume.
spec.rules[*].pathsspecifies the file paths that will be restored from the backed up data.
Let’s create the RestoreSession object that we have shown above,
$ kubectl apply -f ./docs/examples/guides/latest/volumes/restoresession.yaml
restoresession.stash.appscode.com/nfs-pvc-restore created
Wait for RestoreSession to Succeed:
Now, wait for the restore process to complete. You can watch the RestoreSession phase using the following command,
$ watch -n 1 kubectl get restoresession -n demo nfs-pvc-restore

Every 1.0s: kubectl get restoresession -n demo nfs-pvc-restore                  workstation: Wed Jul  3 20:10:52 2019

NAME              REPOSITORY-NAME   PHASE       AGE
nfs-pvc-restore   gcs-repo          Succeeded   32s
From the output of the above command, we can see that restoration process has been completed successfully.
Verify Restored Data:
Let’s verify if the deleted files have been restored in /shared/config/ directory by the following command,
$ kubectl exec -n demo demo-pod-2 ls /shared/config/
index.html
pod-1.conf
pod-2.conf
So, we can see from the above output that the files we had deleted in Simulate Disaster section have been restored successfully.
Cleanup
To cleanup the Kubernetes resources created by this tutorial, run:
kubectl delete backupconfiguration -n demo nfs-pvc-backup
kubectl delete restoresession -n demo nfs-pvc-restore

kubectl delete secret -n demo gcs-secret
kubectl delete repository -n demo gcs-repo

kubectl delete pod -n demo demo-pod-1
kubectl delete pod -n demo demo-pod-2

kubectl delete pvc -n demo nfs-pvc
kubectl delete pv -n demo nfs-pv
If you would like to uninstall Stash operator, please follow the steps here.